Up Your Morning Routine With a DIY Smart Mirror

Up Your Morning Routine With a DIY Smart Mirror

Small Projects and Repairs
By Contractors.com Team August 05, 2021

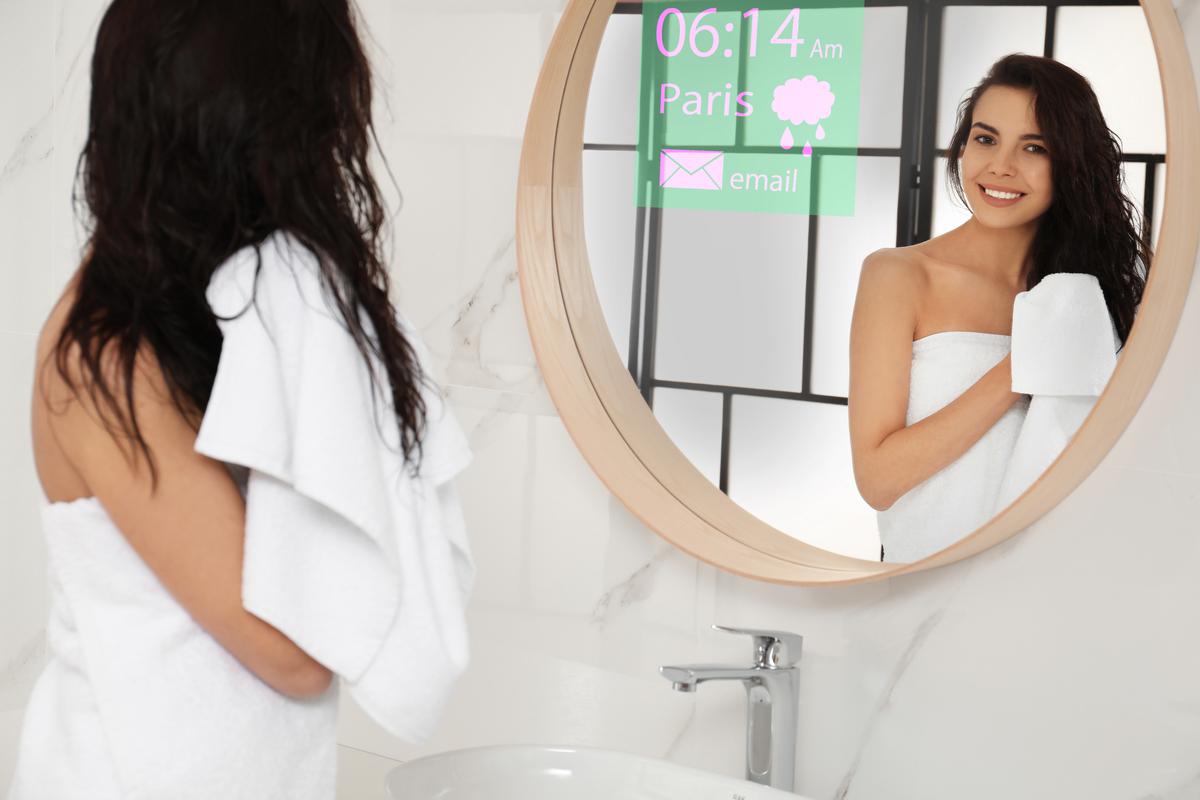
If there is one thing to remind us how far technology has come, it is gadgets like the smart mirror. For some, waking up in the morning, listening to the news, checking the weather forecast, and getting your daily dose of cat videos all while brushing their teeth is a normal routine. While the phenomenon isn’t novel anymore, you may be surprised to learn that you can actually make this dandy piece of tech yourself at home without having to pay big numbers at an electronic store.

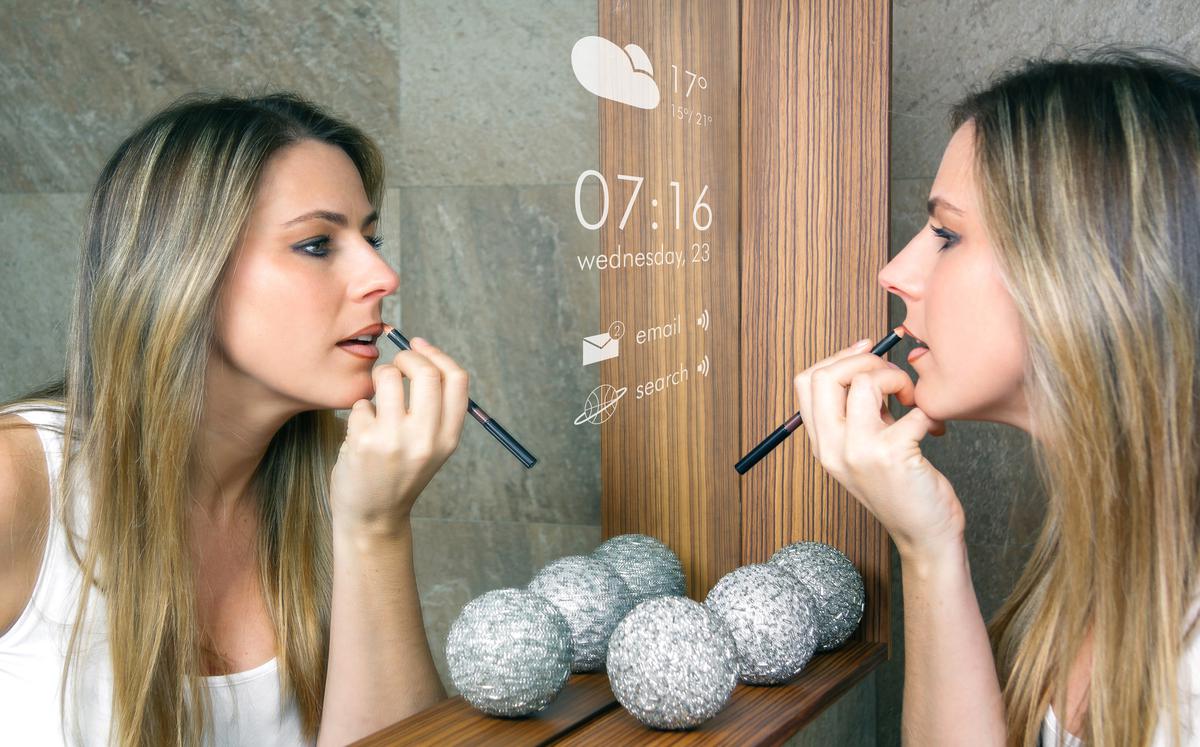
Smart mirrors are a great DIY project for anyone looking to make something cool without having to go through the trouble of purchasing specialized equipment to build it with. You can always get professional assistance through online platforms, especially from home automation specialists who would have plenty of experience with smart mirrors as well as other smart home projects. But, a DIY smart mirror is much easier to install than most people assume and can be a great addition to your bathroom remodel project.

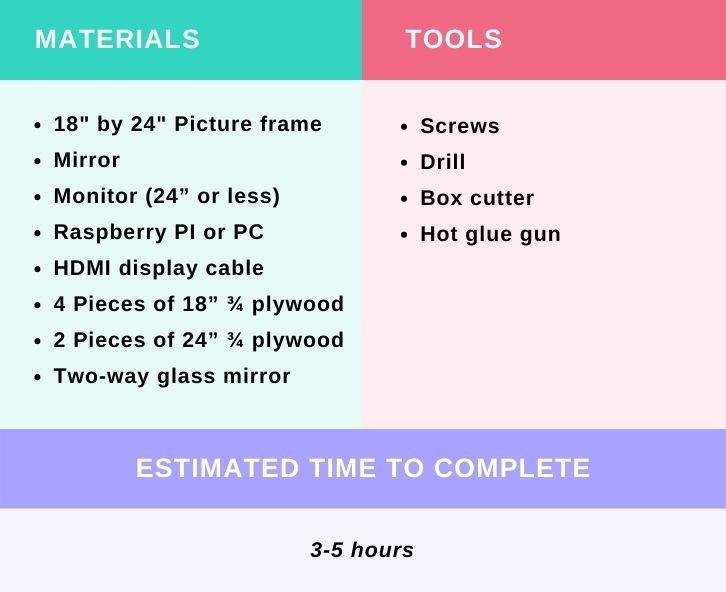
It is also more cost-effective to build one yourself as opposed to buying one. Building a smart mirror costs around $300 to $400 whereas the price of a pre-made one can go up to thousands of dollars. If that is not enough to show you the benefits of building a smart mirror yourself, consider the fact that if you have all the components ready, and a fair amount of tech-savviness, the entire project could only take you three to five hours.

Up the Smart In Your Morning Routine

Up the Smart In Your Morning Routine

Preparation

Step 1. The Raspberry PI should be set up before any of the components are assembled. Raspberry PIs are a type of mini-computer that can be used to create all kinds of gadgets and technological solutions thanks to their compact size. Attach the Raspberry PI to a monitor via an HDMI cable. While you can do this step after the mirror is already built, it can be a little harder as you would have to be careful not to damage the frame or mirror. It’s best to get the application setup and out of the way before any of the smart mirror components are fit in. Do the same if you are using a PC.

The Only Tech You Need to Set Up a Smart Mirror

The Only Tech You Need to Set Up a Smart Mirror

Step 2. Download and install the smart mirror app of your choice, of which there are many options — for both the Raspberry PI and PC. One of the most popular and versatile ones you will find is the MagicMirror app for the Raspberry PI, which comes with hundreds of interface styles and widgets for you to customize your smart mirror with. Connect the Raspberry PI or PC to your monitor and set up the app. Make sure it is working as intended, with the correct time, location, and date settings.

Building

What You Need to Build a Smart Mirror at Home

What You Need to Build a Smart Mirror at Home

Step 3. Take out the cardboard back panel of the 18" by 24" picture frame, but do not throw it away as it will come in handy when fitting in the monitor. Most picture frames come with this panel, but in case yours does not, find a relatively sturdy piece of cardboard and cut it to the dimensions of the frame.

Step 4. Strengthen the frame using hot glue just to make sure it is not too flimsy when the heavier parts go in. Thicker frames may not need this, but it is always useful to be on the safe side.

Step 5. Attach the two 18” and two 24” ¾ plywood strips to the back of the frame to extend the back of the frame according to their corresponding lengths. This is the compartment that is going to house all the components and wires. Attach the plywood strips using the pocket screw holes which are provided by the manufacturer. 

Tip: If the ¾ plywood strips don’t come with pocket holes, you can ask the hardware store to make them for you if you do not have the pocket hole tool yourself. 


Step 6. Place the two-way mirror
into the frame. Make sure that the transparent side is facing outward, as you will need to see the screen once it is inside. The manufacturer will have a hint at which is the transparent side. 

Step 6. Take the screen out of its plastic casing by unscrewing the front and back plastic panels. Once the screen is taken out, you should handle it very carefully. While a modern screen is built to be very durable, it can still be easily damaged when it is removed from its protective shell. 

Step 7. Place the screen on the picture frame cardboard back panel and outline the shape of the screen. Use a box cutter to cut the shape of the screen out of the cardboard panel. Place the screen into the hole and hot glue the screen to it so that now you have the screen surrounded by the cardboard panel, which should help you fit the screen into the picture frame easily. 

Step 8. Place the screen with the cardboard border into the picture frame and twist the metal notches onto the cardboard to fasten it into place. The screen should now fit into the picture frame and should be as sturdy as the metal notches will allow.

Step 9. Drill the two extra 18” ¾ plywood strips horizontally along the back of the frame of the mirror. These are fastened to keep the screen sturdy inside the frame and act as little shelves to place the Raspberry PI on, as well as the other wires.

Steps to Building Your Own Smart Mirror

Steps to Building Your Own Smart Mirror

Step 10. Connect the Raspberry PI or PC to the screen and check to see if everything is functioning. Since you installed the smart mirror app on your device before building the mirror, the app should be easy to activate and check right on the spot. You will not only be able to see your reflection, but also the screen from behind the two-way mirror. If the display is working, the orientation fits that of the frame, and the app is performing as it should, then the smart mirror is set for use. 

Step 11. Organize the wires and devices in the back of the frame. You can use velcro wire straps or zip ties to keep the wires bunched up, then hot glue them to the panel to keep them from falling or sticking out from behind the mirror. The Raspberry PI can also be hot glued to the back of the panel as it can most certainly fit inside the frame. If you are connecting the screen to your PC and don’t wish to have the HDMI display cable visible behind the mirror, you can plug a smart USB dongle into the screen and connect it to your computer wirelessly.

Step 12. Hang the mirror from the wall and activate it. If the smart mirror app was installed correctly you should be able to see the application from behind the mirror as well as your reflection above it. 

Step 13. Show off to your friends about the fact that you managed to build a smart device on your own and how it works as well. Your inner carpenter and glazier will be proud of the accomplishment and the thought of waking up to a smart bathroom mirror will make the start of each day a little funner to get through.  

A Few Tips and Tricks

While smart mirrors are pretty self-explanatory in terms of how they can be used and what benefits they offer, there are some extra steps you can take to make them more practical and advanced. Whether it is for your convenience or for the simple sake of creating something even more impressive, there are some extra tips and tricks you can try to take your smart mirror to the next level.

You Can Make A Touch Screen Mirror Yourself, Here's How

You Can Make A Touch Screen Mirror Yourself, Here's How

  • If you can find a touch screen monitor, as well as a two-way mirror that allows for touch control, you can create a touch screen smart mirror. This will allow you to control the mirror without using a smart speaker, mouse, and keyboard, or your phone. Simply touch the screen to use the app and control everything on the spot. While this is a more in-depth project and can take a few more hours to do, it is definitely rewarding. If you’re looking to build a touch screen smart mirror, you will need to invest in an infrared touch display instead. This will set you back an extra $200 but will give you greater control and more functionality over your smart mirror. 

  • Some monitors come with a USB hub which can be used to charge your phone. You can install a phone holder to the side of the mirror and have it plugged into the monitor. This way, you can do your morning wash while charging your phone. It is another convenience that will make mornings just a little easier.

  • Another great upgrade for a monitor with a built-in USB hub is LED lights behind the mirror. Plug the lights into the monitor USB and control it via the app. This is not only a great way to add some extra utility to your smart mirror but also to create a pleasant ambiance in the bathroom or wherever the smart mirror is placed. The extra illumination can also turn a standard mirror into a smart makeup mirror.

  • There are different kinds of two-way mirrors you can install depending on the transparency you prefer. Some two-way mirrors are a lot more dense, meaning you can see your reflection a lot more clearly. But the screen behind it is not going to be as visible even if the screen is on full brightness. Alternatively, there are two-way mirrors that are not as reflective, but the screen behind them is much easier to see.
DIY Smart Mirror

DIY Smart Mirror

Written by
Contractors.com Team

Written by Contractors.com Team

Welcome to the Contractors.com Team, a group of passionate individuals dedicated to helping homeowners achieve their dream home through the best-in-class service providers and inspiring content.


We believe that every homeowner deserves to have a home that they love, and we're committed to making that a reality. Whether you're looking to remodel your kitchen, renovate your bathroom, or build your dream home from scratch, we've got you covered.


When it comes to creating content, we take a multi-faceted approach. We gather insider tips from experts in the home service industry, and do our own thorough research to write informative and engaging articles that are tailored to our readers' needs. At the same time, we harness the power of A.I. and GPT-3 technologies to generate titles, headlines, and even entire articles that are optimized for SEO and designed to provide value to our readers.


We're committed to providing the best possible service to our readers, and we're always looking for ways to improve. Whether you're a homeowner looking for inspiration or a service provider looking to join our network, we're here to help you achieve your goals.

comments