How to Stop a Floor From Squeaking

How to Stop a Floor From Squeaking

Flooring
Small Projects and Repairs
By Dikran Seferian February 03, 2022

Imagine tip-toeing your way to the kitchen for a midnight snack while trying to be as silent as possible, only to have your efforts wasted by that squeaky floor. These irritating floor creaks actually define a home’s character. They mark the arrival of children and pets. They expose teenagers sneaking in after curfew. They give a house its voice. Many homeowners, however, may not be very fond of noisy flooring. And it’s understandable because — let’s be honest — it can get rather annoying after a while. Luckily, there are several squeaky floor solutions, and they’re considerably easier than having to replace the entire flooring.

What Causes Floors to Squeak

Understanding what causes a floor to squeak can be helpful if you plan on handling the repair yourself. The common root of all creaks is the friction caused by two flooring components brushing against each other. These elements include:

  • Nails or staples that have lost their grip on the floorboard and are grazing through the hole instead. This is usually the case with most floor squeaks;
  • A floorboard that’s rubbing against another. In certain cases, the floorboard may be brushing against another wooden element such as a stud;
  • Subfloor fasteners being pulled in and out of the joist;
  • Metal ducts scraping against the hole in the flooring through which they go to floor level; However, this is a rare case since it’s normally around the perimeter where it seldom sees foot traffic;
  • Bowed or uneven joists brushing the subfloor.

The best way to stop the squeaks is by getting rid of the friction. This usually involves physically handling the pieces that are rubbing against each other and stopping at least one of them from moving. 

Get A Flooring Quote

How to Fix Squeaks from Below

Effective Ways to Repair a Creaky Floor from Underneath

Effective Ways to Repair a Creaky Floor from Underneath

Repairing a squeaking floor will be relatively easier and seamless if you have access to areas below your flooring, such as a basement or a crawlspace. Should the space below be a fully designed room with a ceiling and all, you may want to determine whether the time and effort it takes to remove or replace a section of the ceiling is more convenient than working from above. Bear in mind that working with drywall can be rather messy. However, it is a relatively inexpensive and straightforward project that will allow you to get to the root of the problem. There are several approaches to fixing the issue, depending on what’s causing it. 

Pinpointing the Squeak 

Before proceeding with the repair, your first course of action will be to locate the squeak from below. This involves having someone from the room above step on the squeaky area as you pinpoint the spot from below. Consider using mobile phones or two-way radios to communicate with the person above. Once you locate the spot, mark it by making an ‘X’ with painter’s tape. That is where you’ll be opening the ceiling to access the faulty components.

Shimming the Floorboard

Gently tap a wood shim in the space between the joist and the subfloor or the floorboard. If it works, take the shim out, coat it with glue, and drive it back in just far enough that the squeaking stops. Make sure not to force it too far in or you’ll raise the flooring.

Pulling the Layers Together

As opposed to shimming the floorboard, which separates the flooring materials, another approach essentially involves bringing the layers together using a product known as Squeak Ender. This specially designed hardware is composed of a threaded rod assembled to a mounting plate and a metal bracket with a hook. Simply position the product under the squeaky spot and install it as per the instructions. The Squeak Ender prevents any bowing effect caused by shims and pulls the layers back together.

Sistering the Floorboards

You can fix twisted, bent, or malformed joists by sistering a 2x4 along with them. This method involves positioning the 2x4s against the subfloor or the floorboards. 

Get A Flooring Quote

Using Carpenter’s Glue

Another way to get rid of the squeaky noise is by gluing the flooring. Simply drive a long bead of construction adhesive between the joists and the floorboards or the subfloor.

Creating Lateral Control

In certain instances, lateral control is equally crucial as vertical control. If the joists don’t have to block, or the blocks are functioning as they should, consider fitting 2x8 boards between the midpoints of the joists. This method involves simply tapping the boards into place and hammering them into the joists with nails. 

How to Fix Squeaks from Above 

If you don’t have access to the underside of your flooring, or if getting access is too inconvenient, you could try a few methods from the area above. However, this means getting rid of the creaking noise without causing damage to the floor. The different methods also depend on the type of flooring you have. Squeaking noises are mostly common among carpeted and hardwood flooring.

Repairing Squeaks Under Hardwood Floors

How to Get Rid of Hardwood Floor Creaks

How to Get Rid of Hardwood Floor Creaks

In the case of hardwood or engineered wood floors, the squeak might be due to the floorboards brushing against each other. One way to fix this is by squirting powdered graphite between the boards and using a rag to gently rub the material into the seams. Make sure to remove excess powder with a vacuum.

Another reason why your hardwood floors might be squeaking is low levels of humidity. This dries out the wood and amplifies squeaking. You can counter this by adding a humidifier to adjust the moisture levels of your home.

An alternative way to stop hardwood floor creaking involves drilling a pilot hole through the floorboard at a certain angle above the joist and nailing a 1-inch finish nail through that hole. For the next step, you’ll be countersinking the nail with a nailset and covering the tiny hole using a wood filler that matches the color of your hardwood flooring. Once the filler dries, lightly sand it down till it levels with the floor.

Repairing Squeaks Under Carpeting

Fixing a Squeaky Floor if You Have Carpeting

Fixing a Squeaky Floor if You Have Carpeting

Besides hardwood, you may also experience creaks with wall-to-wall carpeting. To fix a squeaky floor under a carpet, pull back the covering to get access to the subfloor and locate the joists. Using a screwdriver, insert 1-inch screws into the subfloor and the joists near the squeaky spot. You may use screws and nails that are longer than an inch in certain cases. However, 1-inch nails are always a safe bet as they reduce the risk of causing damage to the electrical or plumbing system.

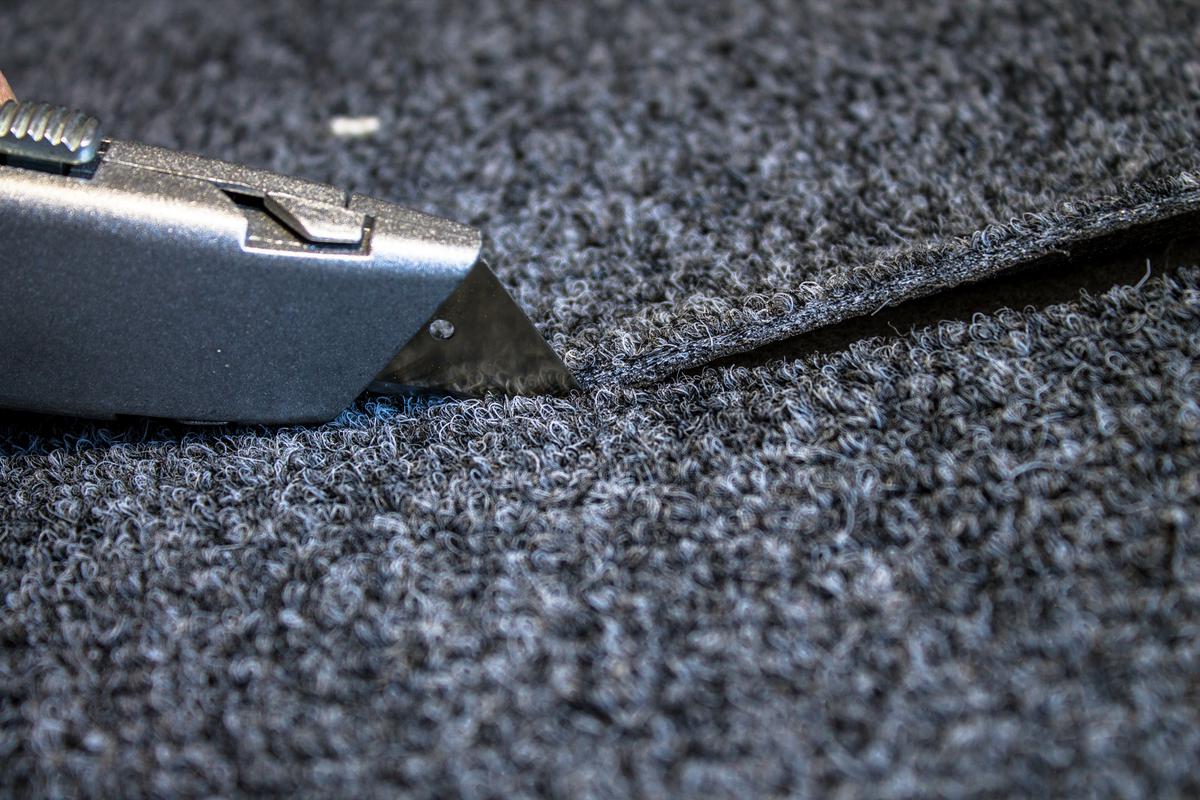
In case the carpeting cannot be pulled back, you may want to expose an area about a quarter-inch in diameter by separating the carpet fibers. If you have to, use a utility knife to tear back a few fibers just enough to expose the area. Run a 1-inch screw through the spot until the head of the screw is flush with the carpet backing. Using your fingertips, comb the carpet fibers back to cover the area up.

How to Quiet Squeaky Stairs

It’s not uncommon for interior staircases to produce a symphony of squeaks and creaks. This is due to the dozens of wooden parts that constitute the stairs. These parts expand and contract as time passes, loosening up the joints between them. Consequently, you would hear annoying groans with every step you take. As with repairing squeaky floors, you can fix a creaking stairway either from above or the underside. 

Fixing a Squeaky Stairway from the Rear

  • For the most effective repairs, see if you can access the backside of the stairway in closets or the basement.
  • Coat a few wood shims with glue and tap them into the joints between the treads and the risers from the back.
  • Alternatively, screw blocks of wood into the corners that connect the risers and treads.

Fixing a Creaking Stairway from Above

Should you not be able to access the underside of the stairway, there are a couple of topside repairs you can try. The first method involves tapping a handful of very thin shims into loose or creaky joints and neatly trimming them off with your utility knife. As for the other way, you’ll need to glue and nail shoe molding along each step. This essentially reinforces any loose parts.

What You’ll Need

Tools and Equipment

Material

Painter’s tape

Nails

Hammer

Wood glue

Utility knife

Wood shims

Nail set

1-inch finish nails

Rags

1-inch screws

Soft brush

Wood filler

Cordless drill

Construction adhesive

Fine-grit sandpaper

Powdered graphite

Humidifier

2x4 boards

Vacuum

2x8 boards

Estimated Time: 30 minutes to 1 hour

Quarter-round shoe molding

Get A Flooring Quote

DS

Written by
Dikran Seferian

Written by Dikran Seferian

comments