
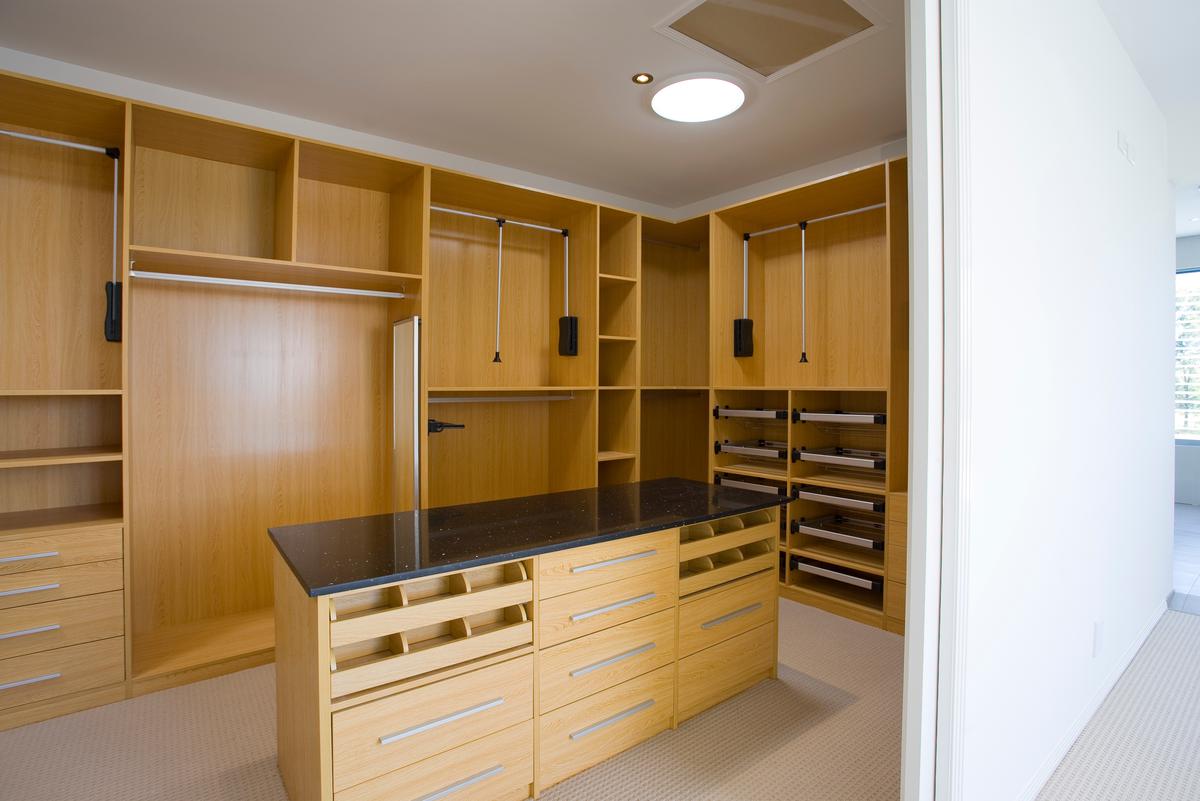
Having a walk-in closet is a common dream among almost every homeowner — especially fashion enthusiasts who would drool at the idea. Imagine walking into a room with all your precious sneakers proudly displayed on one side, a row of jackets on the other, and everything else neatly categorized in their own places. Sounds lovely, doesn’t it? Besides increasing your storage possibilities and reducing clutter, a step-in wardrobe may also boost your home value by a considerable margin. Walking into your dream closet doesn’t have to be something you would only fantasize about. If you’re handy with tools and have a couple of weekends to spare, you can build your very own walk-in closet.
Planning and Designing Your Walk-In Closet
Before getting started with the DIY walk-in closet project, it would make sense to do some planning and designing. These preliminary steps will allow you to picture what you want and know what to expect. Moreover, a well-planned project will go smoother and will most likely end up more successful.
Location, Location, Location
The biggest factor you need to account for when preparing to build your walk-in closet is where you’ll be building it. In many cases, you can either build it in an alcove or along a wall or two. The latter is the obvious option if your room has an open layout. You may also want to determine whether your room is spacious enough to realize this project. On the other hand, an existing alcove can be a perfect zone for a DIY walk-in closet.
Determine the Layout
Once you’ve decided on a location, you’ll need to design the layout of what your walk-in closet will look like. Make sure to account for the factors that determine the amount and allocation of space. Start with the entrance to the closet. Will you be using doors that fold, swing, or the ones that slide? Will you be storing only clothing and fashion accessories or other items as well? What storage options are you planning on incorporating? You may also want to take into consideration non-storage space such as a spot for ironing clothes and adequate room to move around in. For instance, you could go for an island walk-in closet with an ironing and folding area in the center. If you don’t need the extra space, however, you may be interested in a corridor-style narrow walk-in wardrobe.
There are several factors to account for when designing your walk-in closet.
Sketch Your Plans
Consider drawing a rough sketch of how you think your closet should look. It would also help to sketch several versions of the layouts you have in mind — having a plan B is always a good idea. Using strings and tacks, test your layouts in the intended location in order to figure out the dimensions. When you come up with a walk-in closet design that seems to be plausible, you can easily calculate the dimensions by measuring the strings. Alternatively, you could use cardboard boxes to visualize your plans.
See if You Need a Permit
Building a walk-in closet essentially means that you’re adding a room to your living spaces. Each area may have different laws regarding this matter. Get in touch with your local building department to make sure whether you need a permit to go ahead with your project. For instance, you will most likely need an electrical permit to install lighting in your walk-in wardrobe interior.
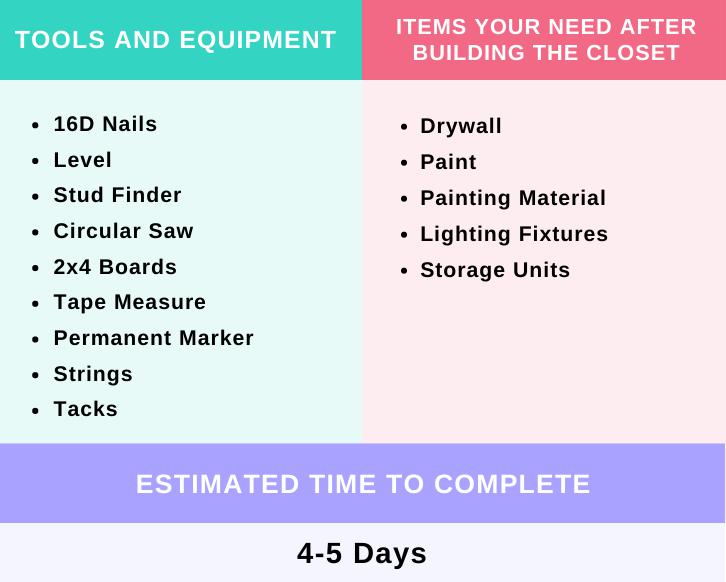
Building Your Own Walk-In Closet
While there are no limits as to how you can design your walk-in wardrobe, you will want the result to meet your expectations. To guarantee the success of your home improvement project, you could go for an option that is basic and budget-friendly. Even the simplest layouts can serve their intended purpose in terms of efficiency and function.
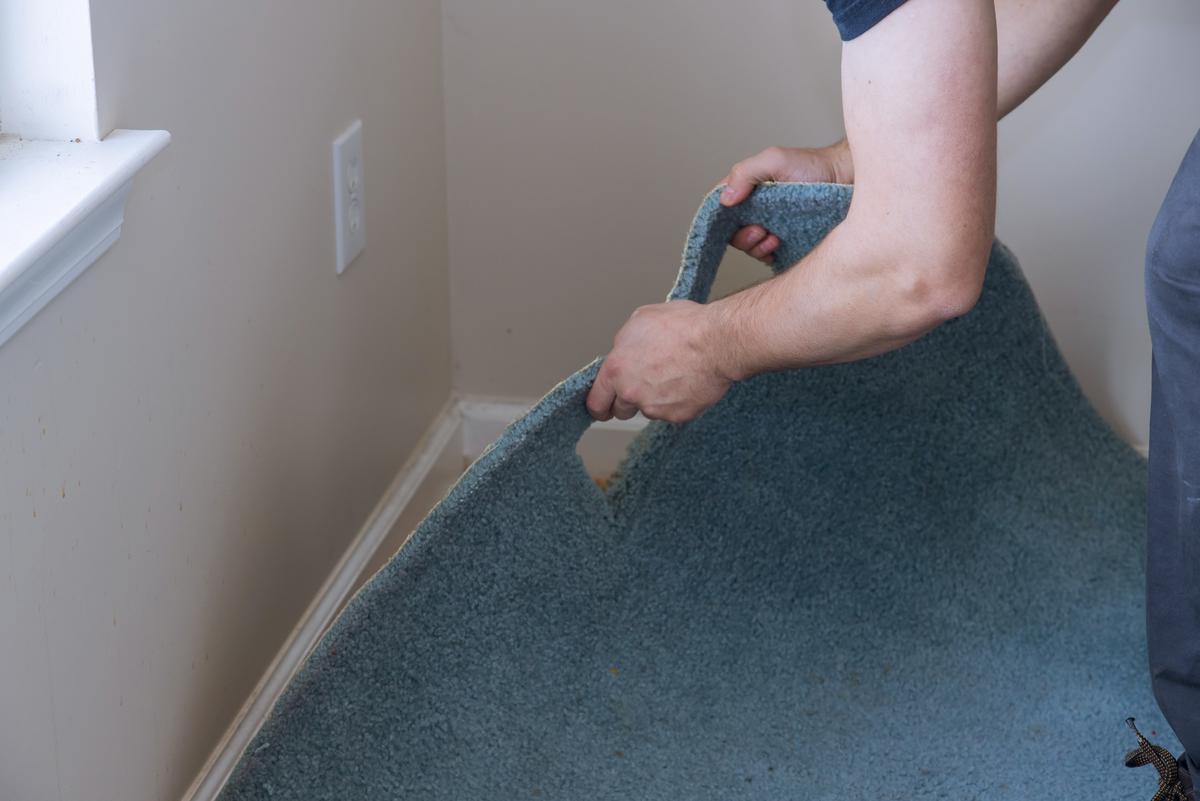
Preparing the Space
If the room is carpeted, you will need to pull the carpet up along with the underlay and the tack strips where the closet will be. Once you’re done with the whole project, you can cut it accordingly so that it fits around the wardrobe. Remove the baseboards from sections of existing walls that will be incorporated into the custom walk-in closet. Measure along those sections to find the studs nearest to where you’ll be assembling your new walls; the stud is where you’ll need to anchor them. Using a 2x4, mark a line along with the height of the wall where the stud is. Once the new walls are ready, you will line them up with those marks.
Tip: To locate the studs more accurately, consider using a stud finder (available at home improvement stores for $10 to $20).
What are the preliminary steps to take before building a walk-in wardrobe?
Building The Walls
For the header and the footer plates, cut two 2x4 boards according to the length of the first wall. Mark the spacing of the studs along the plates using a marker and a tape measure. Take into account that the center of each stud should be 16 inches from that of the next one. Cut as many 2x4 you will need to the height of the wall you’re building. An extra two studs will serve as the end caps which you’ll nail on each end of the footer plate. As for the remaining studs, nail each of them into their marked slots along the footer and nail the header plate on the top end.
Building The Entry
Using the same method as above, build the wall where the walk-in closet’s door will be. Only this time, mark the entry space and simply skip over it when marking the studs. After nailing the studs and header, make a door header by cutting a 2x4 board to the width of the entry. Nail your door header across the entry space at the height of the door you’ll be installing later on.

Make sure to use caution when nailing the parts of your step-in wardrobe walls.
Erecting the Walls
Raise your first wall into its place and line it up with the marks you drew on the existing wall. Make sure the wall is level, using shims where necessary. To secure it, nail the end stud to the existing wall every two feet. Fix the wall to the floor and ceiling by nailing along the header and footer boards in between the studs.
Reinforcing the Structure
If you think you will need more structural support for items such as walk-in wardrobe drawers and shelving, simply cut more 2x4 boards and nail them between the existing studs. The more studs you have, the more items you can hang later on.
Finalizing the Project
Once the foundations of the walk-in closet are ready, you can now hang the drywall. For an easier and more inexpensive installation, consider going for plastic panels as a drywall alternative. Mark the locations of the studs with a pencil and simply lift the panels into place and drill them into the stud centers. Next, you will be installing the closet door of your choice. For regular sliding doors, install the hinges along with the space you allocated for the entry and position the door in its place. If you’re going for a sliding door, you’ll need to install a door railing on which the door will sit.
At this point, your closet is almost complete; all that’s left is to paint the walls and add the interior walk-in wardrobe units. Before painting your walk-in wardrobe, make sure to properly mud and primer the drywall. Consider painting the closet walls in the same color as those of the rest of the room. Doing so would allow the walk-in closet to assimilate into the room more organically. Alternatively, you can apply wallpaper to your step-in wardrobe instead of painting it.
Once the paint is dry or the wallpaper is set, you can finally install the walk-in closet shelving and storage units. Use L-shaped brackets that you can make out of steel pipes to support the units. Secure the brackets to the closet walls by screwing them into the studs. Attach the other side of the brackets to the storage units from the top.

LED strips can be an ideal option for walk-in wardrobe lighting.
After the main units are in place, you can install the shelves and other walk-in wardrobe accessories as per your layout plans. Finally, you will need to add the lighting fixtures. A popular choice for illuminating a walk-in closet involves running LED strips among the storage units. Now that the walk-in closet is built, illuminated, and ready to go, it’s time to fill up the spaces. Make sure to avoid cluttering the place by organizing your clothes according to the layout you designed for them.


comments