Dress Up Any Room with a DIY Blanket Ladder

Dress Up Any Room with a DIY Blanket Ladder

Small Projects and Repairs
Decoration and Design
By Contractors.com Team August 03, 2021

If you’re looking for a DIY project that’s both affordable and simple, look no further. Truly, few other projects are as easy to do as this. A blanket ladder is unlikely to cost you more than $15 to build, and yet it adds a lot of charm and practicality to the space you choose to use it in. Sure, there are other neat storage items such as wire baskets and storage benches. But even these storage solutions can be complex ones to build compared to the blanket ladder. 

Plus, the rustic blanket ladder is one of the interior decor trends of the year. It provides a storage solution that is a world apart thanks to its warm design. This makes a blanket ladder a perfect addition to a minimalist home, but it can also go well with a variety of other interior design styles. When you put together the ease of construction and affordability, it’s no wonder they are one of the most popular DIY projects around. The tools and materials needed to build this nifty blanket ladder are also basic and easy to find.

6 Simple Steps to Build a Blanket Ladder

6 Simple Steps to Build a Blanket Ladder

How to Build a Blanket Ladder 

The entire process of building a blanket ladder should only take a day to complete. If you’re especially adept in DIY stuff, it might be something you can do in just a few hours. 

1. Cut the Beams

The first order of business is to cut the beams to the size you need for your blanket ladder. A good height for the blanket ladder is between 6 and 6 ½ feet. This also depends on which height will ration into the height of your home’s ceilings more seamlessly. In general, though, a 6 ½ feet tall blanket ladder should fit quite nicely in most homes. 

2. Cut the Rung

The next thing to consider is how many rungs you want this ladder to have. More rungs can increase the number of blankets you can store but may have the unintended side effect of making everything look cramped and cluttered. A safe number to aim for is five rungs. After all, you can always stack multiple blankets on one rung if push comes to shove. 

You also need to decide how wide you want your rungs to be. Wider rungs (18 inches for instance) will be quite hefty and chunky-looking, but can hold more blankets. Narrow ones will be very skinny which might be a good thing if you want your blanket ladder to look like an actual ladder. However, 15 inches is a good middle-ground for most since it’s a good balance between aesthetics and practicality.

The Versatility of a Blanket Ladder Will Keep On Rewarding You In Style

The Versatility of a Blanket Ladder Will Keep On Rewarding You In Style

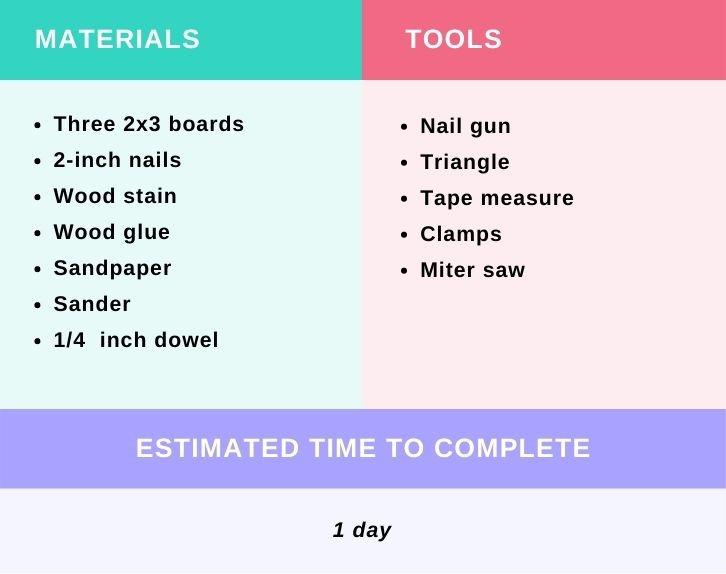
3. Do Some Measuring

The next step is to determine the gap that will be between each rung. The best way to do this without resorting to a lot of maths is to eyeball it. This isn’t rocket science, so we don’t need absolute precision. To get the spacing as even as possible simply lay out the beams and put rungs in the places they would go when the blanket ladder is fully assembled. 

Get them as evenly spaced as you can and then use a tape measure to fine-tune things. It’s ok if things are not perfect, as a small imprecision won’t be super noticeable, especially if you’re planning to complete an eclectic room. Once you have the rungs spaced apart as you want them, mark those points so you can start drilling.

4. Put in The Rungs

The best orientation to put the rungs in on a blanket ladder is vertical, as this makes it easier to hang blankets without having them fall off. To attach the rungs, first put some wood glue on the ends of each rung and then assemble the blanket ladder. Use the wood clamps to keep the blanket ladder from coming apart until the wood glue dries. To keep things level, use a little wood wedge from any scraps left from cutting the beams. 

Once the ladder is assembled (and before the glue dries) use a nail gun to put in two to three nails on the end of each rung for additional structural reinforcement. Once the glue has dried, your blanket ladder should be quite sturdy and ready for some final touches.

5. Do Some Sanding

Wood likes to splinter, especially after it’s been cut, so be sure to sand your blanket ladder using a combination of sanders and sanding papers. This will remove any offending splinters and also help scrape away any excess wood glue, making it easier to apply the stainer. Speaking of which... 

6. Bring Out The Stainer

Whether you’re going to use it outdoors or indoors, staining is a very important detail for any wooden piece of furniture. It not only improves the appearance of furniture but will also protect the wood from rot and insects. Because a wooden blanket ladder is relatively small, you don’t need fancy brushes to stain it. Instead, simply don some latex gloves and rub the stainer into the wood with a clean rag. 

The stainer you choose is up to you, just keep in mind that some stainers are designed for outdoor use only, and may give off unpleasant smells if used indoors. Also, some wood stains are darker than others, so be sure to choose a stain that has the color you prefer. Aim to apply two coats of stain, and be sure to wipe away any excess with a separate rag.  
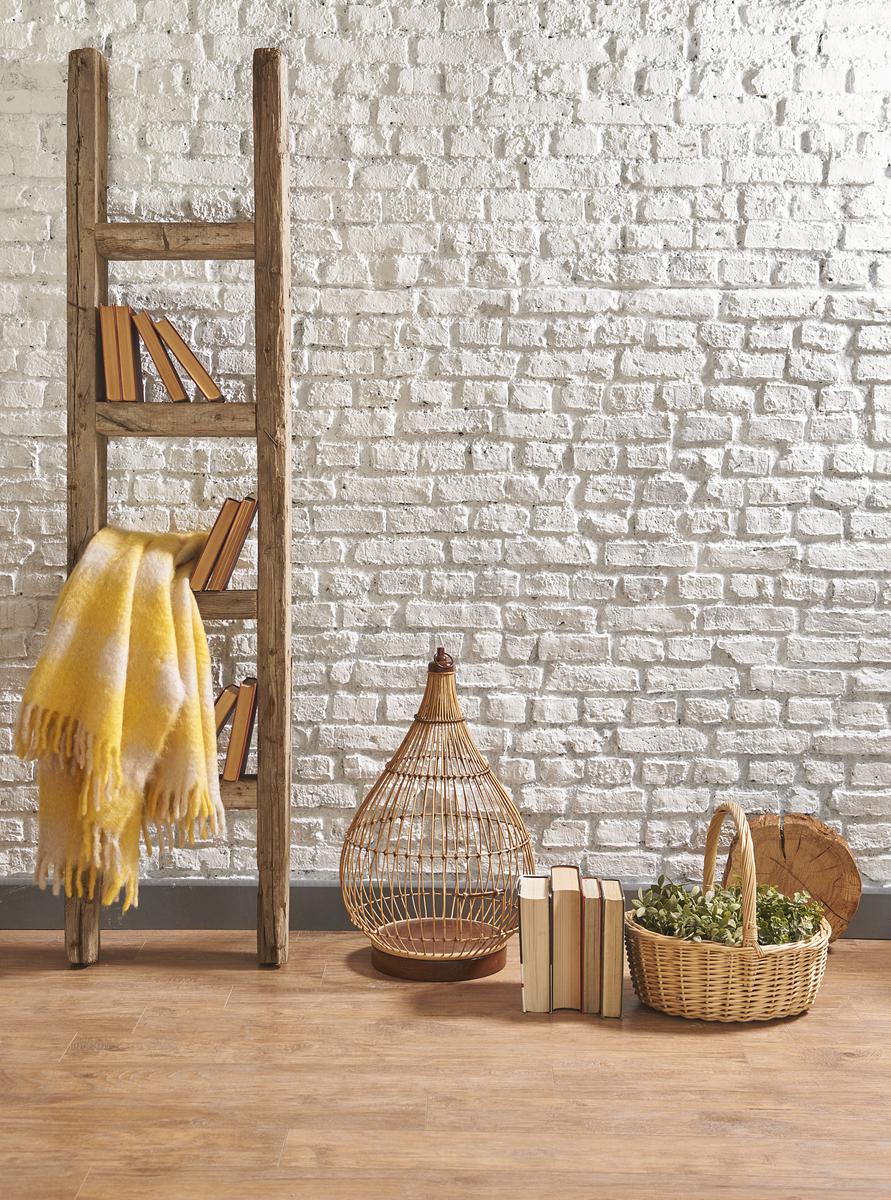
All Done! 

Once the stainer has dried, your blanket ladder is ready for action and should give you many trouble-free years of fancy blanket storage. Plus, if your veteran blanket ladder starts to show its age, refinishing and resurfacing will be enough to make it good as new again. And if push comes to shove, replacing one of the rungs (for rot, for instance) is a cinch.  

Decor that's Perfect for Storage and Aesthetic

Decor that's Perfect for Storage and Aesthetic

Shelf Ladders

Your blanket ladder can easily be made into a shelf ladder instead. This will be more useful if you want to use your blanket ladder as a nifty little shelf for books and decor. To build this compact shelf, the process is almost the same. The only difference is that instead of mounting your rungs vertically, you will want to mount them horizontally. 

This will give each rung more surface area so it can be used more like a traditional shelf. Additional reinforcement isn’t necessary as this shelf ladder should be able to support itself easily. Another cool way to increase the versatility of your blanket ladder is to make it a blanket-shelf combination where half of the rungs are vertical and half are horizontal to hold both blankets and whatever else you’d like. 

Shelf Ladders Can Hold Your Blankets, Books, and Lattes

Shelf Ladders Can Hold Your Blankets, Books, and Lattes

Where You Can Put Your Blanket Ladder

Another great thing about blanket ladders is that they can be used in so many different places. Of course, you can use them as a place to put blankets by your bedside as their name implies, or as a place for knick knacks or decor if you’re using it as a shelf. However, a blanket ladder can also be a great addition to a guest bedroom, providing a stylish and easy-to-find place for blankets. 

This could come in real handy if your guest feels cold in the middle of the night and needs an extra layer of warmth. With the same logic, you can move a wall-mounted blanket ladder into the living room for movie nights. In the bathroom, a blanket ladder can make a great place for towels and bathroom supplies, especially if you build it in the “combo” configuration.

The Perfect Throw Storage Idea for Every Room

The Perfect Throw Storage Idea for Every Room

Your handcrafted ladder can also move outside, to hold beach towels for a pool party. Another outdoor option is to spruce up your patio or porch, for which blanket ladder/shelf can be quite a useful thing to have. As a shelf, your wooden blanket ladder could serve as a lovely little place to put your outdoor dining ware or drinks when mingling. It can also be a neat place to put some potted plants or flowers so you can add a rustic feel to your patio.

DIY Blanket Ladder

DIY Blanket Ladder

Written by
Contractors.com Team

Written by Contractors.com Team

Welcome to the Contractors.com Team, a group of passionate individuals dedicated to helping homeowners achieve their dream home through the best-in-class service providers and inspiring content.


We believe that every homeowner deserves to have a home that they love, and we're committed to making that a reality. Whether you're looking to remodel your kitchen, renovate your bathroom, or build your dream home from scratch, we've got you covered.


When it comes to creating content, we take a multi-faceted approach. We gather insider tips from experts in the home service industry, and do our own thorough research to write informative and engaging articles that are tailored to our readers' needs. At the same time, we harness the power of A.I. and GPT-3 technologies to generate titles, headlines, and even entire articles that are optimized for SEO and designed to provide value to our readers.


We're committed to providing the best possible service to our readers, and we're always looking for ways to improve. Whether you're a homeowner looking for inspiration or a service provider looking to join our network, we're here to help you achieve your goals.

comments